A production-grade walkthrough: clean auth service, real code from a real app, and integration patterns.
Table of Contents
- Introduction
- Prerequisites
- Dependencies & Setup
- Getting the Server Client ID
- The Clean AuthService
- Platform Configuration
- Common Errors & Fixes
- UI Example
- Conclusion
01 / Introduction
Why Social Sign-In Still Matters in 2026
Every additional step between a user opening your app and them being inside it is a drop-off point. Password flows are friction. Google and Apple Sign-In are the fastest path from “curious” to “engaged” — two taps and you’re in, no new password to forget.
Who this is for
Flutter developers at any level who want latest Google and Apple Sign-In that actually works in production.
02 / Prerequisites
What You Need Before Starting
- A Firebase project with Authentication enabled — Google and Apple providers turned on
- FlutterFire CLI installed and flutterfire configure already run
- For Apple Sign-In: an Apple Developer account with Sign In with Apple capability enabled
- For Android Google Sign-In: SHA-1 fingerprint registered in Firebase Console
03 / Dependencies & Setup
Packages, pubspec, and Initialization
Add to pubspec.yaml
dependencies:
flutter_dotenv: ^5.2.1
firebase_core: ^3.10.1
firebase_auth: ^5.5.1
google_sign_in: ^7.2.0
sign_in_with_apple: ^7.0.1

flutter:
assets:
- .env
Then run:
flutter pub get
Create your .env file
Store sensitive config outside of source code. Create a .env file in your project root and add it to .gitignore:
# Get this from Google Cloud Console → OAuth 2.0 → Web Client (see Section 4)
SERVER_CLIENT_ID=123456789-abcdefg.apps.googleusercontent.com
Initialize Firebase and Google Sign-In in main.dart
This is the most important step people miss, you must call GoogleSignIn.instance.initialize() before runApp(), after Firebase is ready:
import 'package:flutter_dotenv/flutter_dotenv.dart';
import 'package:firebase_core/firebase_core.dart';
import 'package:your_app/service/auth_service.dart';

void main() async {
WidgetsFlutterBinding.ensureInitialized();

// 1. Load environment variables
await dotenv.load(fileName: '.env');

// 2. Initialize Firebase
await Firebase.initializeApp(
options: DefaultFirebaseOptions.currentPlatform,
);

// 3. Initialize AuthService (which calls GoogleSignIn.instance.initialize)
await AuthService().initialize();

runApp(const MyApp());
}
Skip initialize() and you’ll get a StateError
If you call authenticate() or authorizationClient before initialize(), Flutter throws a StateError: instance not initialized. This crashes silently in release builds. Always initialize first.
04 / Google Cloud Configuration
Getting the Server Client ID (Web OAuth Client)
The serverClientId is the Web Client ID from Google Cloud Console — not the Android or iOS client. It is required for Google Sign-In on Android and enables server-side token verification. Here’s exactly how to find it:
Google Cloud Console — Step-by-step walkthrough
- Go to console.cloud.google.com and select your Firebase project (same project name as in Firebase Console)
- In the left sidebar, navigate to APIs & Services → Credentials
- Under OAuth 2.0 Client IDs, look for the entry with type “Web application”. It is usually auto-created by Firebase and named something like “Web client (auto created by Google Service)”
- Click the Web application entry to open its details
- Copy the Client ID field — it ends in
.apps.googleusercontent.com. This is yourSERVER_CLIENT_ID. - Paste it into your
.envfile asSERVER_CLIENT_ID=
Can’t find the Web Client?
If you don’t see a Web Client ID, go to Firebase Console → Authentication → Sign-in method → Google → click the expand arrow. Firebase will show you the Web SDK configuration which contains the same client ID.
Android vs iOS vs Web — use the Web client
There will be separate entries for Android, iOS, and Web in the credentials list. The serverClientId parameterspecifically requires the Web client ID. Using the Android or iOS client ID here is a common mistake that silently fails.
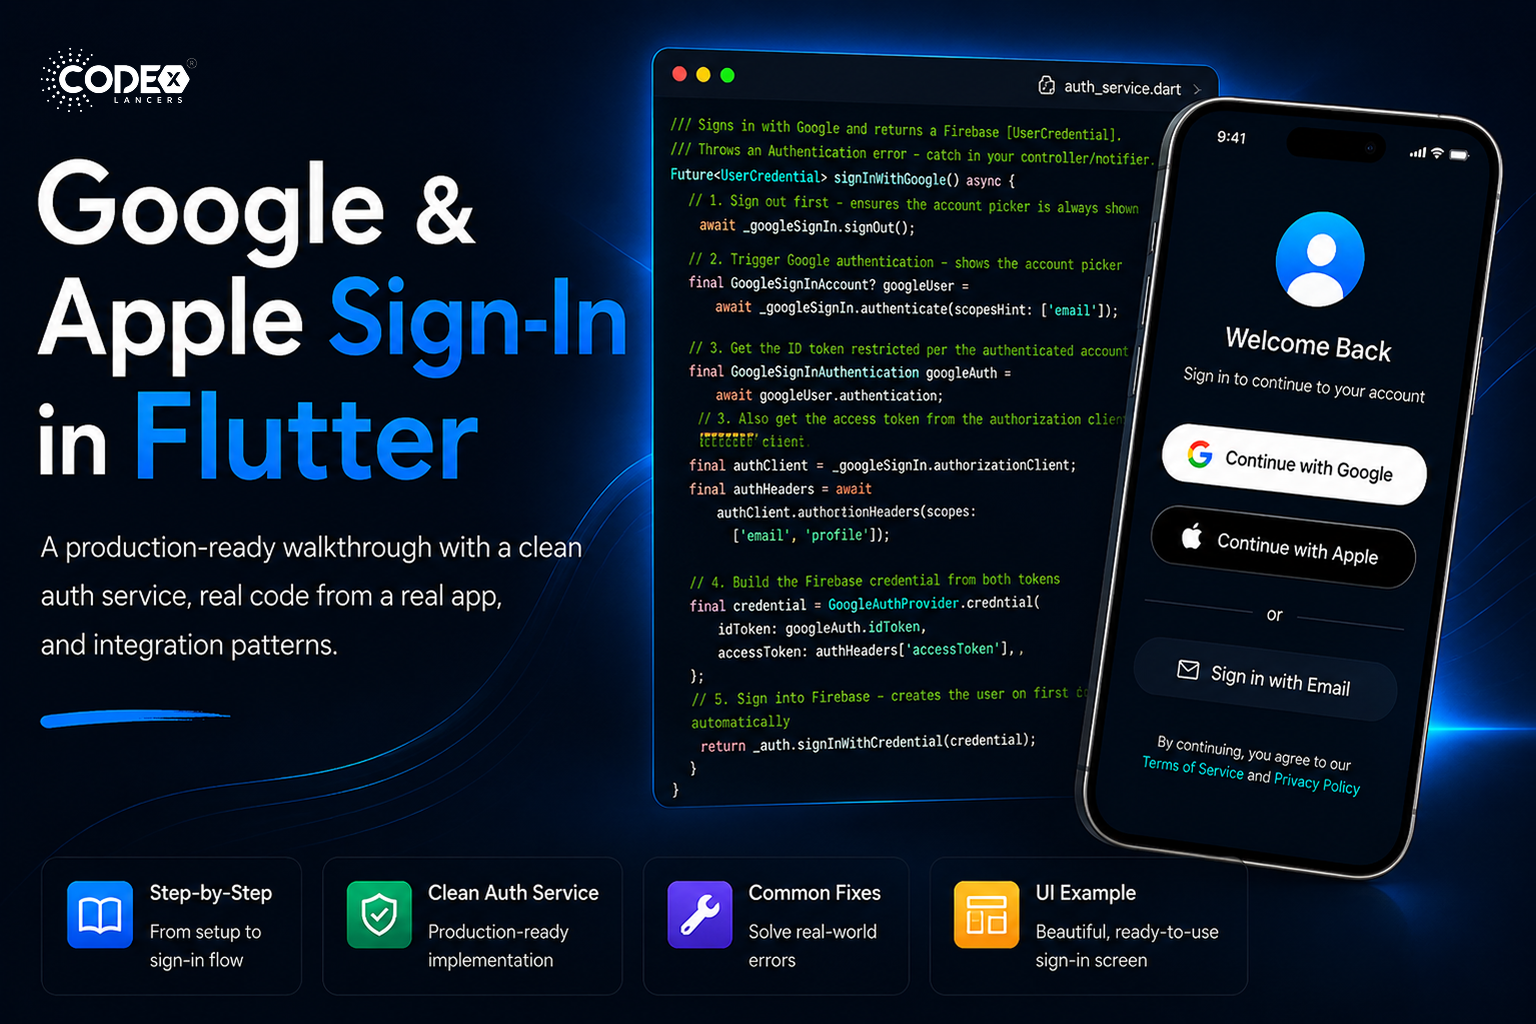
05 / The Clean AuthService
Authentication Service Implementation
Here’s the authentication logic, cleaned up:
lib/service/auth_service.dart
import 'dart:developer' as log;
import 'dart:math';
import 'package:firebase_auth/firebase_auth.dart';
import 'package:flutter_dotenv/flutter_dotenv.dart';
import 'package:google_sign_in/google_sign_in.dart';
import 'package:sign_in_with_apple/sign_in_with_apple.dart';

/// Clean authentication service — auth logic only, no database concerns.
/// Use it as a foundation and add your own data layer on top.
class AuthService {
// ─── Singleton ───────────────────────────────────────────
static final AuthService _instance = AuthService._internal();
factory AuthService() => _instance;
AuthService._internal();

// ─── Firebase + Google ────────────────────────────────────
final FirebaseAuth _auth = FirebaseAuth.instance;
final GoogleSignIn _googleSignIn = GoogleSignIn.instance;

/// Web Client ID from Google Cloud Console → OAuth 2.0 → Web application
String get _serverClientId => dotenv.env['SERVER_CLIENT_ID'] ?? '';

// ─── Public Getters ───────────────────────────────────────
User? get currentUser => _auth.currentUser;
bool get isSignedIn => currentUser != null;

// ─── Initialization ───────────────────────────────────────

/// Call once at app startup, after Firebase.initializeApp().
/// Required by google_sign_in v7+ before any sign-in call.
Future initialize() async {
try {
await _googleSignIn.initialize(serverClientId: _serverClientId);
log.log('[AuthService] Google Sign-In initialized');
} catch (e) {
log.log('[AuthService] Google init error: $e');
rethrow; // fail fast — misconfiguration should be caught at startup
}
}

// ─── Google Sign-In ───────────────────────────────────────

/// Signs in with Google and returns a Firebase [UserCredential].
/// Throws on cancellation or error — catch in your controller/notifier.
Future signInWithGoogle() async {
// Sign out first — ensures the account picker is always shown
await _googleSignIn.signOut();

// 1. Trigger Google authentication — shows the account picker
final GoogleSignInAccount googleUser = await _googleSignIn.authenticate(scopeHint: ['email']);

// 2. Get the ID token directly from the authenticated account
final GoogleSignInAuthentication googleAuth = googleUser.authentication;

// 3. Also get the access token from the authorization client (for scopes)
final authClient = _googleSignIn.authorizationClient;
final authorization = await authClient.authorizationForScopes(['email', 'profile']);

// 4. Build the Firebase credential from both tokens
final credential = GoogleAuthProvider.credential(
idToken: googleAuth.idToken,
accessToken: authorization?.accessToken,
);

// 5. Sign into Firebase — creates the user on first login automatically
return _auth.signInWithCredential(credential);
}

// ─── Apple Sign-In ────────────────────────────────────────

/// Signs in with Apple ID and returns a Firebase [UserCredential].
/// Throws on cancellation or error — catch in your controller/notifier.
Future signInWithApple() async {
// 1. Generate a cryptographically random nonce (replay-attack protection)
final rawNonce = _generateNonce();

// 2. Request Apple credential — opens the system Sign-In sheet
final appleCredential =
await SignInWithApple.getAppleIDCredential(
scopes: [
AppleIDAuthorizationScopes.email,
AppleIDAuthorizationScopes.fullName,
],
);

// 3. Build the Firebase OAuthCredential using Apple's identity token
final oAuthCredential = OAuthProvider('apple.com').credential(
idToken: appleCredential.identityToken,
rawNonce: rawNonce,
accessToken: appleCredential.authorizationCode,
);

// 4. Sign into Firebase
return _auth.signInWithCredential(oAuthCredential);
}

// ─── Sign Out ─────────────────────────────────────────────

/// Signs out from both Firebase and Google simultaneously.
Future signOut() async {
await Future.wait([
_auth.signOut(),
_googleSignIn.signOut(),
]);
}

// ─── Error Messages ───────────────────────────────────────

/// Converts a FirebaseAuthException into a user-readable message.
static String getFirebaseErrorMessage(FirebaseAuthException e) {
switch (e.code) {
case 'user-not-found': return 'No account found with this email.';
case 'wrong-password': return 'Incorrect password.';
case 'email-already-in-use': return 'This email is already registered.';
case 'invalid-email': return 'Please enter a valid email.';
case 'weak-password': return 'Password is too weak.';
case 'too-many-requests': return 'Too many attempts. Try again later.';
case 'network-request-failed': return 'No internet connection.';
case 'operation-not-allowed': return 'This sign-in method is not enabled.';
case 'account-exists-with-different-credential':
return 'An account with this email exists with a different sign-in method.';
default: return 'Authentication failed. Please try again.';
}
}

// ─── Nonce Generator (Apple Sign-In) ─────────────────────

/// Generates a cryptographically secure random string.
/// Apple uses this to prevent replay attacks on the identity token.
String _generateNonce([int length = 32]) {
const charset = '0123456789ABCDEFGHIJKLMNOPQRSTUVXYZabcdefghijklmnopqrstuvwxyz-._';
final random = Random.secure();
return List.generate(length, (_) => charset[random.nextInt(charset.length)]).join();
}
}
06 / Platform Configuration
Android & iOS Setup
Android — Google Sign-In
1. Get your SHA-1 fingerprint
# Debug keystore (development)
keytool -list -v \
-keystore ~/.android/debug.keystore \
-alias androiddebugkey \
-storepass android -keypass android
# Copy the SHA1 line from the output, e.g.:
# SHA1: A1:B2:C3:D4:E5:F6:...
Add this SHA-1 in Firebase Console → Project Settings → Your Android app → Add fingerprint. Then re-download google-services.json and place it at android/app/google-services.json.
Add both debug and release SHA-1
The debug SHA-1 works only during development. For production (Play Store), add the SHA-1 from yourupload keystore. Missing the release SHA-1 causes silent failures after publishing.
2. Verify build.gradle files
android/build.gradle
buildscript {
dependencies {
classpath 'com.google.gms:google-services:4.4.2'
}
}
android/app/build.gradle
// Must be at the very bottom of the file
apply plugin: 'com.google.gms.google-services'
iOS — Google Sign-In
Add the reversed client ID URL scheme
Open GoogleService-Info.plist, find the REVERSED_CLIENT_ID value, then add it to ios/Runner/Info.plist:
ios/Runner/Info.plist
CFBundleURLTypes


    CFBundleTypeRole
    Editor
    CFBundleURLSchemes


      com.googleusercontent.apps.YOUR_REVERSED_CLIENT_ID
iOS — Apple Sign-In
1. Enable the capability in Xcode
Open ios/Runner.xcworkspace in Xcode → select Runner target → Signing & Capabilities → + Capability → Sign In with Apple.
2. Enable in Apple Developer Portal
Log into developer.apple.com → Identifiers → select your App ID → check Sign In with Apple → Save. Regenerate your provisioning profile.
3.Enable in Firebase Console
Firebase Console → Authentication → Sign-in method → Apple → Enable. Paste your App ID (e.g. com.company.app) as the Service ID.
4.Add the entitlement (if needed)
Xcode usually handles this automatically when you add the capability. Verify Runner.entitlements contains com.apple.developer.applesignin with value Default.
Apple Sign-In on Android
sign_in_with_apple supports Android via a web-based OAuth flow. You need to configure a web redirect URL in Apple Developer Console and add it to the plugin configuration. See the package README for the full Android setup guide.
07 / Debugging
Common Errors & Exact Fixes
1. StateError: instance not initialized
Root Cause: GoogleSignIn.instance is used before calling initialize()
Fix: Make sure to call and await AuthService().initialize() inside main() before runApp()
2. sign_in_failed (Android)
Root Cause: SHA-1 fingerprint is missing or incorrect
Fix: Add both debug and release SHA-1 in Firebase Console, then re-download google-services.json
3. PlatformException: sign_in_canceled
Root Cause: User closed the Google account picker
Fix: This is expected behavior — handle it silently without showing an error toast
4. operation-not-allowed
Root Cause: Google Sign-In is not enabled in Firebase
Fix: Go to Firebase Console → Authentication → Sign-in method → Enable Google
5. idToken is null
Root Cause: Authentication failed or was canceled silently
Fix: Always check googleAuth.idToken != null before creating credentials
6. Missing REVERSED_CLIENT_ID (iOS)
Root Cause: URL scheme is not configured in Info.plist
Fix: Add CFBundleURLSchemes using the REVERSED_CLIENT_ID from GoogleService-Info.plist
7. AuthorizationError: canceled (Apple)
Root Cause: User canceled Apple Sign-In
Fix: Catch SignInWithAppleAuthorizationException and ignore when e.code == AuthorizationErrorCode.canceled
8. Apple name is null (returning user)
Root Cause: Apple only provides the user’s name during the first sign-in
Fix: Save the name in your database when isNewUser == true and reuse it later
9. account-exists-with-different-credential
Root Cause: Same email is used with another authentication provider
Fix: Use fetchSignInMethodsForEmail() and guide the user to link accounts
10. Apple Sign-In not working on Simulator
Root Cause: iOS Simulator does not support Apple Sign-In
Fix: Always test Apple Sign-In on a real device
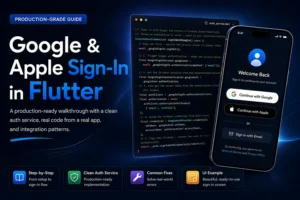
08 / UI Example
/// GOOGLE LOGIN
Future loginWithGoogle() async {
setState(() => isLoading = true);
final result = await AuthService().signInWithGoogle();
setState(() => isLoading = false);
if (result.isSuccess) {
_showMessage("Google Login Success ✅");
} else {
_showMessage(result.error ?? "Error");
}
}
/// APPLE LOGIN
Future loginWithApple() async {
setState(() => isLoading = true);
final result = await AuthService().signInWithApple();
setState(() => isLoading = false);
if (result.isSuccess) {
_showMessage("Apple Login Success 🍎");
} else {
_showMessage(result.error ?? "Error");
}
}
09 / Conclusion
Summary & Best Practices
Here’s the complete checklist for production-ready social sign-in:
- Initialize once — call
AuthService().initialize()inmain()after Firebase and beforerunApp() - Server Client ID = Web Client — get the Web application client from Google Cloud Console, not Android or iOS
- Sign out Google on each sign-in — call
_googleSignIn.signOut()before authenticating so the picker always appears - Both tokens for Firebase — always pass both
idTokenandaccessTokentoGoogleAuthProvider.credential() - Use a secure nonce for Apple — generate it with
Random.secure(), always pass rawNonce to the Firebase credential - Save Apple name immediately — it’s only available on the first sign-in; save it to your database right after
isNewUser == true - Detect new vs returning users — use
userCredential.additionalUserInfo?.isNewUserto branch your post-auth flow - Sign out from both — always call both
_auth.signOut()and_googleSignIn.signOut()on logout - SHA-1: debug + release — add both fingerprints to Firebase or Google Sign-In breaks in production builds
- Test Apple on a real device — iOS Simulator does not support Apple Sign-In.