WE ARE HIRING • WE ARE HIRING • 
Certified Flutter Consultants|RevenueCat Technical Partners|4.9★ Rated on Clutch|Top Rated Plus · Upwork|250+ Projects Delivered|200+ Happy Clients Worldwide|Delivering Excellence Since 2019|The Expertise Behind Every Product We Build|Helping Businesses Across Industries Innovate|Voices of the Companies We’ve Helped|
Home/Blogs/Which Flutter State Management Should You Use? (Complete Developer Guide)
flutterApril 7, 2026

Which Flutter State Management Should You Use? (Complete Developer Guide)

Flutter makes building beautiful apps easy — but as your app grows, managing data across screens becomes challenging. You may have faced issues like: UI not updating properly Data not syncing between screens Too many unn

Which Flutter State Management Should You Use? (Complete Developer Guide)

Flutter makes building beautiful apps easy — but as your app grows, managing data across screens becomes challenging.

You may have faced issues like:

  • UI not updating properly
  • Data not syncing between screens
  • Too many unnecessary rebuilds

This is exactly where state management becomes essential.

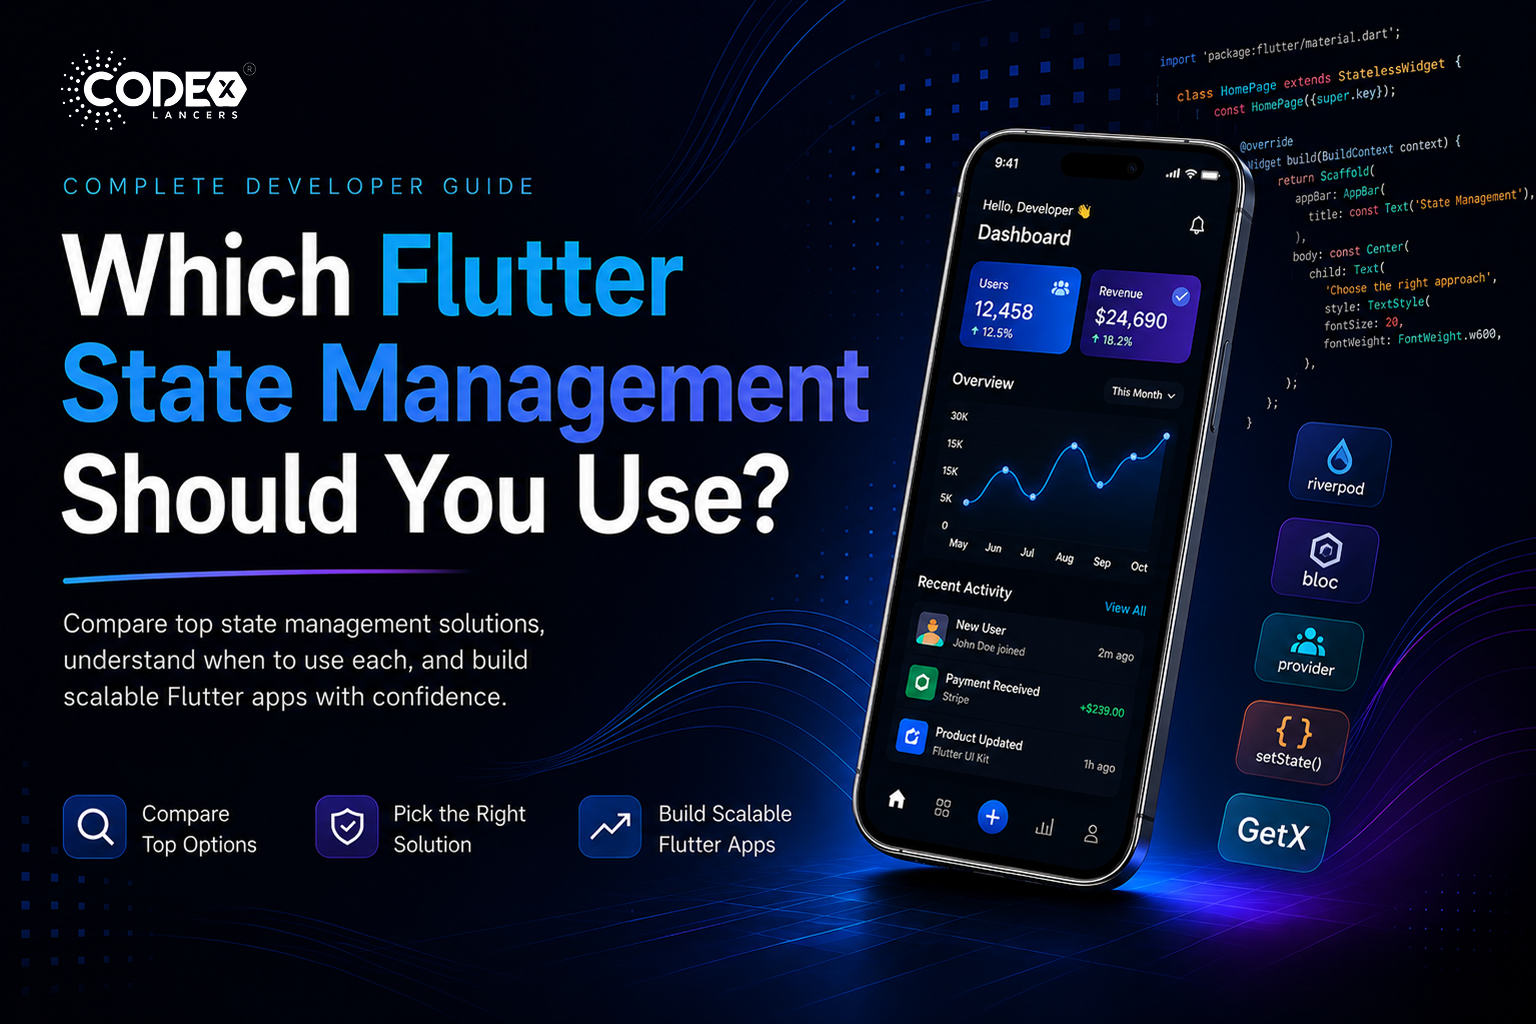
In this guide, we’ll break down everything — from basics to advanced approaches — so you can confidently choose the right solution.

What is State Management?

In simple terms:

State = Any data that changes in your app

Examples:

  • Counter value
  • API response
  • User login status
  • Theme (dark/light)

State Management = How you manage and update that data efficiently across your app

Without proper state management:

  • Your UI becomes unpredictable
  • Code becomes hard to maintain
  • Scaling becomes difficult

 1. setState (The Simplest Way)

What it is

Built-in Flutter method to update UI when state changes.

Example :

class CounterPage extends StatefulWidget {
const CounterPage({super.key});

@override
State createState() => _CounterPageState();
}

class _CounterPageState extends State {
int _count = 0;

void _increment() {
setState(() { // triggers a rebuild
_count++;
});
}

@override
Widget build(BuildContext context) {
return Scaffold(
body: Center(child: Text('Count: $_count')),
floatingActionButton: FloatingActionButton(
onPressed: _increment,
child: const Icon(Icons.add),
),
);
}
}

When to use :

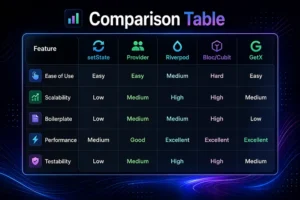
Purely local UI interactions with no cross-widget communication — toggle buttons, form field validation, simple animations, local loading spinners.

2. Provider

What it is

A wrapper around InheritedWidget for structured state management.

Example :

// 1. Define a ChangeNotifier
class CartProvider extends ChangeNotifier {
final List _items = [];
List get items => _items;

void addItem(String item) {
_items.add(item);
notifyListeners(); // triggers rebuild in listeners
}
}

// 2. Wrap your tree with ChangeNotifierProvider
ChangeNotifierProvider(
create: (_) => CartProvider(),
child: const MyApp(),
)

// 3. Read or watch in any descendant widget
final cart = context.watch();
Text('${cart.items.length} items in cart')

When to use :

Small-to-medium apps with straightforward state that doesn’t need complex async logic. Great for your first real Flutter project beyond tutorials.

 3. Riverpod (Modern Approach)

What it is

A more powerful and safer version of Provider.

Example :

// pubspec.yaml
// riverpod_annotation: ^4.0.2
// riverpod_generator: ^4.0.3

part 'auth_notifier.g.dart';

// Class-based notifier with codegen
@riverpod
class AuthNotifier extends _$AuthNotifier {
@override
AuthState build() => const AuthState.initial();

Future signIn(String email, String password) async {
state = const AuthState.loading();
try {
final user = await AuthService().signIn(email, password);
state = AuthState.authenticated(user);
} catch (e) {
state = AuthState.error(e.toString());
}
}
}

// In a ConsumerWidget — no BuildContext magic needed
class AuthScreen extends ConsumerWidget {
const AuthScreen({super.key});

@override
Widget build(BuildContext context, WidgetRef ref) {
final authState = ref.watch(authNotifierProvider);

return authState.when(
initial: () => const LoginScreen(),
loading: () => const CircularProgressIndicator(),
authenticated: (user) => HomeScreen(user: user),
error: (msg) => ErrorView(message: msg),
);
}
}

When to use :

Medium-to-large apps where you want clean architecture, excellent async support, and testability without Bloc’s ceremony. Excellent choice for solo developers and small teams building production apps.

 4. Bloc / Cubit (Enterprise-Level)

 What it is

A structured pattern using streams.

  • Bloc → Event-driven
  • Cubit → Simpler version

Example :

// State class
class AuthState {
final bool isAuthenticated;
final String? userId;
const AuthState({required this.isAuthenticated, this.userId});
}

// Cubit — logic lives here, NOT in the widget
class AuthCubit extends Cubit {
AuthCubit() : super(const AuthState(isAuthenticated: false));

Future signIn(String email, String password) async {
final user = await AuthService.signIn(email, password);
emit(AuthState(isAuthenticated: true, userId: user.id));
}

void signOut() => emit(const AuthState(isAuthenticated: false));
}

// Widget — just listens, zero logic
BlocBuilder(
builder: (context, state) {
return state.isAuthenticated
? const HomeScreen()
: const LoginScreen();
},
)

When to use :

Large-scale apps with complex business logic, multiple async operations, strict testability requirements, or teams that need predictable, traceable state transitions. Common in enterprise and fintech Flutter apps.

5. GetX (Fast & Lightweight)

What it is

All-in-one solution (state + routing + dependency injection).
Example :

// Controller — reactive variables with .obs
class ProfileController extends GetxController {
  final RxString name = ''.obs;
  final RxBool isLoading = false.obs;

  Future loadProfile() async {
    isLoading.value = true;
    final data = await ApiService().getProfile();
    name.value = data.name;
    isLoading.value = false;
  }
}

// Widget — Obx auto-rebuilds when .obs changes
class ProfilePage extends GetView {
  @override
  Widget build(BuildContext context) {
    return Obx(() {
      if (controller.isLoading.value) {
        return const CircularProgressIndicator();
      }
      return Text(controller.name.value);
    });
  }
}

// Navigation — no BuildContext needed
Get.to(() => const ProfilePage());
Get.back();

When to use :

Prototypes, hackathons, small personal projects, or when you need to move very fast and want everything under one roof. Use with caution in large team environments.

Real-World Use Cases

Small Apps

Use:

  • setState
  • Provider

Example: Forms, basic apps

Medium Apps

Use:

  • Provider
  • GetX

Example: Dashboard, e-commerce

Large Apps

Use:

  • Riverpod
  • Bloc

Example: Production apps with APIs

Team / Enterprise

Use:

  • Bloc
  • Riverpod

Better maintainability and structure

Final Recommendation

Beginner

Start with:

  • setState → then Provider

Intermediate

Use:

  • Riverpod (recommended)
  • or GetX

Advanced / Production

Use:

  • Riverpod (modern + scalable)
  • Bloc (enterprise structure)

Final Thoughts

There is no single “best” state management solution.

The right choice depends on:

  • App complexity
  • Team size
  • Development speed
  • Maintainability needs
Keep Reading
Related Articles

You Might Also Like

FlutterFlow’s New Feature: App Events (A Game Changer for Scalable Apps)
flutterApr 21, 2026

FlutterFlow’s New Feature: App Events (A Game Changer for Scalable Apps)

Building scalable applications in low-code platforms has always been a balance between speed and maintainability. While FlutterFlow makes UI development incredibly fast, managing communication between different parts of an app could sometimes become complex. But with the introduction of App Events, FlutterFlow has taken a major step forward — bringing cleaner architecture, better performance, and a much more scalable approach to app development. The Problem Before App Events Before this update, handling communication between screens or components often involved: Passing multiple navigation parameters Managing complex global or local state Writing tightly coupled logic between screens As apps grew larger, this approach became: Hard to maintain Difficult to debug Less scalable What Are App Events? App Events introduce a decoupled communication system inside FlutterFlow. Core Idea: Trigger an event from anywhere in the app Listen and respond to that event from anywhere No direct connection between components is required. This means your app becomes: More modular Easier to maintain Much cleaner in terms of logic How It Works (Simple Example) Let’s say a user adds an item to the cart 🛒 Without App Events: Manually update cart badge Refresh product list Update summary screen Pass state across multiple screens With App Events: Trigger event → “Cart Updated” All relevant UI components automatically react That’s it. No messy logic. Key Highlights Global Events App-level events Handled across the entire application Processed sequentially Perfect for: Authentication state changes Analytics tracking Logging Local Events Scoped to specific pages or components Support multiple listeners Trigger instant UI updates Perfect for: UI refresh Component communication Dynamic interactions Why This Feature Matters App Events bring FlutterFlow closer to modern software architecture patterns, such as: Event-driven systems Loose coupling Reactive UI updates Benefits: Less complex code structure Better performance Easier debugging Improved scalability My Take This is easily one of the most impactful updates in FlutterFlow in recent times. It solves a real problem developers face when scaling apps and introduces a pattern that aligns with how modern applications are built. Final Thoughts FlutterFlow continues to evolve beyond just a UI builder — it’s becoming a serious development platform capable of handling complex applications. App Events are a big step in that direction. If you haven’t explored it yet, now is the time. #FlutterFlow #NoCode #LowCode #AppDevelopment #MobileDevelopment #Firebase #UIUX #TechUpdate #Developers

Read more
Integrating Tamara Payment Gateway in a FlutterFlow Application
flutterApr 21, 2026

Integrating Tamara Payment Gateway in a FlutterFlow Application

In today’s digital ecosystem, integrating a reliable payment gateway is essential for delivering a smooth and secure user experience. However, building a payment system isn’t just about processing transactions — it’s about ensuring security, reliability, and compliance, all while maintaining a seamless user journey. Recently, I worked on integrating the Tamara Payment Gateway into a FlutterFlow application, creating a complete end-to-end payment workflow — from initiating transactions to handling real-time updates. The Goal The objective was to implement a secure and scalable payment flow that: Enables users to complete payments smoothly Handles transaction states reliably Ensures compliance with Tamara’s payment standards Works seamlessly across development and production environments The Implementation The integration involved connecting Tamara’s APIs with the FlutterFlow application and managing the full payment lifecycle. Key Features Implemented Tamara Checkout API Integration We used Tamara’s Checkout API to: Initiate payment sessions Redirect users to the hosted checkout page Process transactions securely Secure Payment Handling Security was a top priority. The implementation ensured: Proper API request validation Safe handling of transaction data Compliance with Tamara’s payment flow Webhook Integration for Real-Time Updates To keep track of payment status: Implemented webhooks to receive real-time updates Handled events such as: Payment success Payment failure Transaction updates This ensures the app always reflects the correct payment status. Payment Method Support Enabled support for: Visa cards Mada cards This ensures compatibility with regional payment preferences. Environment Configuration Set up both environments: Sandbox (Development) for testing Production for live transactions This separation ensures safe development and smooth deployment. Reliable Request & Response Handling Carefully managed API communication to: Handle success and failure cases Prevent duplicate transactions Ensure consistency across the payment flow Key Challenge: Hosted Checkout Limitations One of the most interesting aspects of this integration was understanding the limitations of Tamara’s hosted checkout flow. Unlike custom UI payment solutions: The payment interface is controlled by Tamara UI customization options are limited Why This Matters At first, this might seem like a limitation, but it actually ensures: Higher security standards Compliance with payment regulations Reduced risk of implementation errors Understanding these constraints helped align the integration with best practices recommended by Tamara. Final Result The final implementation delivered: A stable and secure payment experience Smooth transaction processing Accurate real-time payment updates Full compliance with Tamara’s standards Users can now complete payments confidently, knowing the system is both secure and reliable. Key Learnings Balancing UX and Security Not all payment flows allow full UI control. Sometimes, prioritizing security and compliance is more important than customization. Importance of Webhooks Webhooks are critical for: Real-time updates Backend synchronization Reliable transaction tracking Tech Stack FlutterFlow Dart Tamara Payment Gateway APIs Webhooks for real-time updates Final Thoughts This integration reinforced an important lesson: A great payment system is not just about UX — it’s about trust, security, and reliability. By combining FlutterFlow with Tamara’s infrastructure, we were able to build a solution that meets both user expectations and industry standards. If you’re working on payment integrations, always remember: Understand platform limitations Follow recommended flows Prioritize security over customization #FlutterFlow #PaymentGateway #Tamara #Fintech #MobileDevelopment #APIIntegration #Webhooks

Read more
1. How I Built a Production-Ready AI Chat App in FlutterFlow (With OpenAI + Firebase)
flutterApr 20, 2026

1. How I Built a Production-Ready AI Chat App in FlutterFlow (With OpenAI + Firebase)

Introduction AI is everywhere in 2026 — but building a production-ready AI chat app is still challenging, especially when using low-code tools like FlutterFlow. In this article, I’ll walk you through how I built a scalable AI chat system using FlutterFlow + Firebase + OpenAI API. Architecture Overview My setup looks like this: Frontend → FlutterFlow UI Backend → Firebase (Firestore + Cloud Functions) AI Engine → OpenAI API Storage → Chat history in Firestore Chat Data Structure Each message is stored like this: { "userId": "123", "message": "Hello AI", "response": "Hi, how can I help?", "timestamp": "server_time" } This allows: Easy chat history retrieval Real-time UI updates Scalable structure Securing OpenAI API Never expose your API key in the frontend. Instead: Use Firebase Cloud Functions Send request → backend → OpenAI → return response This keeps your app secure. Handling Token Usage (Cost Control) AI APIs can get expensive. What I did: Limit message length Store token usage Restrict free users (daily limit) UI Challenges & Solutions Problem: Chat UI lag with many messages Solution: Pagination Lazy loading Efficient Firestore queries Final Result Real-time AI chat Scalable backend Controlled cost Smooth UI Final Thoughts FlutterFlow is powerful — but combining it with backend logic is the real game-changer.

Read more
FlutterFlow + RevenueCat: Complete Guide to Subscription Apps
flutterApr 15, 2026

FlutterFlow + RevenueCat: Complete Guide to Subscription Apps

Introduction If you’re building a SaaS or premium mobile app, subscriptions are one of the most reliable monetization models. But implementing subscriptions correctly is not just about adding a payment button — it involves: Secure validation Real-time status updates Handling edge cases (expiry, restore, refunds) In this guide, I’ll walk you through how I implemented a production-ready subscription system using FlutterFlow + RevenueCat + Firebase. Why RevenueCat? Instead of directly handling App Store / Play Store billing, I used RevenueCat because it simplifies everything. Key Benefits: Single integration for both iOS & Android Handles receipts, validation, and renewals Real-time subscription status via webhooks Reduces development complexity Without RevenueCat, managing subscriptions manually becomes very complex. System Architecture (Simple View) Here’s how the system works: FlutterFlow App (Frontend) User interacts with UI (Upgrade, Restore) RevenueCat SDK Handles purchase flow RevenueCat Server Validates transactions Firebase (Firestore + Cloud Functions) Stores subscription status & triggers updates Complete Subscription Flow Here’s the exact flow I implemented: 1. User Action User clicks “Upgrade to Premium” 2. Purchase Trigger RevenueCat SDK opens native purchase screen (App Store / Play Store) 3. Payment Processing Payment handled securely by Apple/Google RevenueCat validates purchase 4. Webhook Trigger RevenueCat sends event → Firebase Cloud Function 5. Firestore Update User document is updated: { "isPremium": true, "plan": "monthly", "expiryDate": "timestamp" } 6. UI Update FlutterFlow listens to Firestore Premium features unlock instantly Firestore Database Structure To keep things scalable and clean, I used this structure: users collection { "userId": "123", "isPremium": true, "plan": "yearly", "expiryDate": "timestamp" } subscriptions collection { "planId": "monthly_001", "price": 9.99, "duration": "1 month" } events collection (VERY IMPORTANT) { "userId": "123", "eventType": "PURCHASE", "timestamp": "server_time" } This helps in: Tracking revenue Debugging issues Analytics Handling Edge Cases (Most Developers Miss This) This is where most apps fail 1. Expired Subscription Check expiryDate regularly Disable premium access automatically 2. Restore Purchases Add Restore button Sync with RevenueCat Update Firestore again 3. Cancelled Subscription User cancels from App Store RevenueCat webhook updates backend Access removed after expiry 4. Refunds RevenueCat sends refund event Immediately update user access Backend Validation (CRITICAL) Never trust frontend logic Always validate subscription from backend using: Why? Prevents fake unlock hacks Ensures real subscription status Keeps your app secure Performance & Cost Optimization Here’s what I optimized: Avoid Excessive Reads Store only required subscription fields Don’t fetch full history every time Use Real-Time Listeners Smartly Listen only to user document Avoid unnecessary listeners Cache Subscription Status Reduce repeated API calls UI Best Practices (Conversion Focused) Subscription UI is not just design — it impacts revenue 💰 What worked for me: Highlight best plan (yearly) Show discount badge (Save 30%) Clear CTA: “Upgrade Now” Add trust elements (secure payment, cancel anytime) Final Result After implementing this system: Smooth and secure purchase flow Real-time subscription updates Scalable backend architecture Reduced bugs and edge case failures Final Thoughts FlutterFlow + RevenueCat is a powerful combination for building subscription-based apps quickly. But the real difference comes from: Proper backend validation Clean database design Handling real-world edge cases That’s what turns a basic app into a production-ready SaaS product.

Read more